
A few weeks ago I took you behind the screen to show you exactly how to format a blog post in WordPress for maximum results. Today, I want to walk you through how to update old blog posts to revive the work you’ve already done, especially if you didn’t have a clue about SEO, Pinterest performance, or pretty graphics and images.
I went pretty in-depth into formatting your blog post correctly in that post (including a video tutorial!), so I won’t rehash the nitty gritty here, but rather give you a few tips for going back to your past blog posts to enhance them with the knowledge you know now!
Related: How to Format a Blog Post in WordPress (video tutorial included!)
“Megan, why should I care about updating my old posts?”
Well, blogging is work. Hard work. It takes a lot of time, care, and attention to detail to create quality content for your readers and customers.
If you have a slew of old blog posts, you’ve already done a lot of hard work. Sure, you could just leave them be, but why not capitalize on the hard work you’ve already done? With a few nips and tucks, you can take past posts that may be collecting dust and revive them to bring you more exposure today.

And if you are like the masses of friends I talk to, you probably don’t loooooove writing. When it comes to blogging, the main complaint I hear over not understanding WordPress is not liking writing.
So you might as well turn the work of writing you’ve done in the past into a performance driving machine, eh?
I happen to love writing. It calms me. #weirdo But since I’ve been blogging consistently for the past 2.5 years, I’ve come to notice a trend: Unless you create a piece of content that goes wildly viral immediately, your blog posts take time to gain traction.
You can’t just expect to write a post and it result in explosive website traffic right off the bat (again, unless you strike viral gold… but that doesn’t happen often!).
What I love about blogging compared to say social media marketing is that when done well, your blog posts continue to work behind the scenes for you indefinitely to grow exposure to your brand and business.
If you take care to write content that is evergreen (aka posts that will be relevant now and later vs. only talking about current trends), you can create an army of posts that do your marketing for you in the long run.
Okay, so I convinced you? Cool. Let’s talk about how to update old blog posts!
how to Update Old Blog Posts in 10 steps
#1 Assign a keyword and edit the meta description
When I first got started, I knew NOTHING about SEO. Which is normal. None of my old posts had keywords assigned to them (I wasn’t using Yoast back then!). But now that I have an understanding of the basics, assigning keywords to my old posts is a must.
Once I have a keyword selected, I also edit the meta description in my Yoast plugin to maximize the post’s SEO.
Related: I walk you through this in my How to Format a WordPress Blog Post Tutorial!
#2 Edit your titles
If you read my post on the SEO mistakes you are making, one of the topics we discussed were titles. I used to make huge mistakes in titling my posts. Now that I know better, I can go back and update them.
Remove any repeated phrases from multiple posts and make sure your newly assigned keyword is included.
***WARNING: DO NOT edit your old post’s permalink. This will cause any links to your site elsewhere (other blogs, Pinterest, social media, etc) to stop working. Unless you take the time to create a redirect, you do NOT want to edit your old post’s permalink. I don’t have time to go creating a bunch of redirects, so I leave the permalink be.
Related: SEO Mistakes You Are Making in Your Blog Posts… And what to do instead!
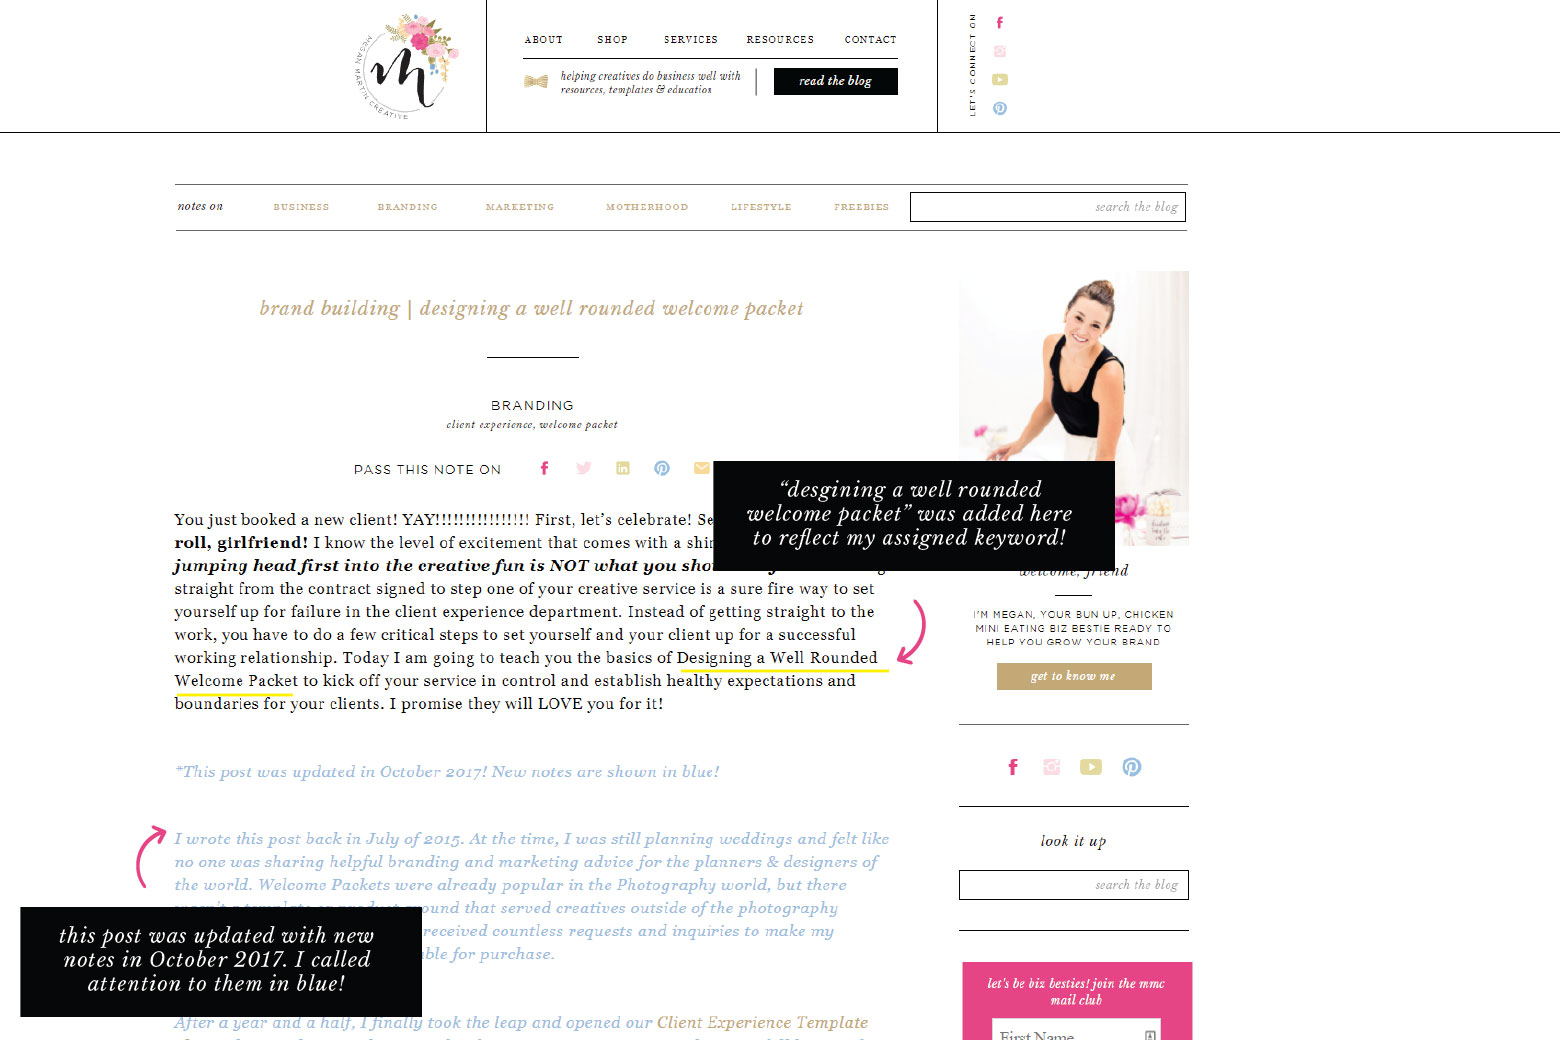
#3 Add your keyword to the first paragraph
If you just assigned a new keyword to your post, edit the first paragraph to include it! This will help you actually start to rank in search engines for that keyword and topic.
#4 Fix any formatting mistakes
Back in the day, I didn’t know to use smaller paragraphs and headers to enhance the reading experience and my SEO. So the first thing I do when updating old posts is to go through the copy and determine where I can naturally break up the text for easier reading and highlighted headers. You can also look for spaces to reformat text into bullets and lists for easier reading.
#5 Update your post copy
If you’re like me, when you go back to read some of your old posts, you kinda cringe knowing all the things you know now. Like the information is still good, but missing vital information you now know to be true.
As I go through my old posts, it is important that the content be relevant and accurate as possible.
So I update the post copy.
You can do this two ways. The first would be to just simply edit your post to reflect new concepts. I choose to do it a different way.
Instead of just deleting my old thoughts and concepts, I make new notes within the post. I do this because many of my readers found me through my old posts and still reference them often. People remember concepts I’ve shared from years ago and mention them to me regularly!
For my readers, completely altering my old post copy would be a bummer.
Plus making new notes on my old posts vs. just changing them altogether it shows that I’m still learning and growing just like every other business owner on the planet and helps encourage my audience that it is okay to start somewhere.
To do this, I simply make a note after the old post’s first paragraph calling to attention that the I’ve updated the post (including the month and year when the update was made) and how my updated notes will be visually represented throughout the copy.
If in doubt on which direction to go, I’d say it really depends on who you are talking to and what your content is about. If you were a food blogger writing recipes, it may be confusing to have an old recipe with new notes. Or if you’re a wedding planner and let’s say you wrote a post on obtaining a marriage license in your county and now the procedures have changed, it would make more sense to just alter the content instead of explaining what used to be the case. For me and my audience, making new notes to update the information just fits better!
*SEO tip when updating your copy: Adding your keyword in more than just the first paragraph is a good idea for SEO. As you fix any formatting issues and update your copy, try to incorporate your keyword naturally within the body of your post.
#6 Check your links
I don’t check all the outbound links as much as I check my inbound links. Just in case. I’ve found multiple old posts with broken inbound (aka linking to pages and posts in my own site) links which totally defeats the purpose of having them in there! And plus, how frustrating for my readers! They are worth checking!
#7 Update your images
Unless you started blogging after the dawn of retina devices (and even knew how to optimize your images for retina devices), your old blog post images are probably not retina ready. Aka they are blurry when currently viewed on modern phones and tablets. #nobueno
I use BlogStomp to resize my images for blogging, so when updating my old posts, I go back and resize the images used in my post to be appropriately sized for retina ready devices. Once correctly sized, I delete the old images and upload the new ones into my Media Library.
Related: The Best Tools for Blogging Success You Need Now – In it, I talk about BlogStomp and how to make retina ready images!
Along with updating my old posts with retina ready images (when needed), I also make sure my images are properly titled and include my keyword in the alt text. Don’t forget this step for boosting your SEO!
#8 Update Your Graphics
A good quality and eye-catching post graphic is paramount to getting exposure to your blog posts on the Pinterest platform.
So if you don’t have a graphic on your old post, make one and load that puppy in.
But if you do, is it in line visually with the graphics you use now? Keeping your Pinterest graphics visually cohesive helps when it comes to brand awareness on the platform.
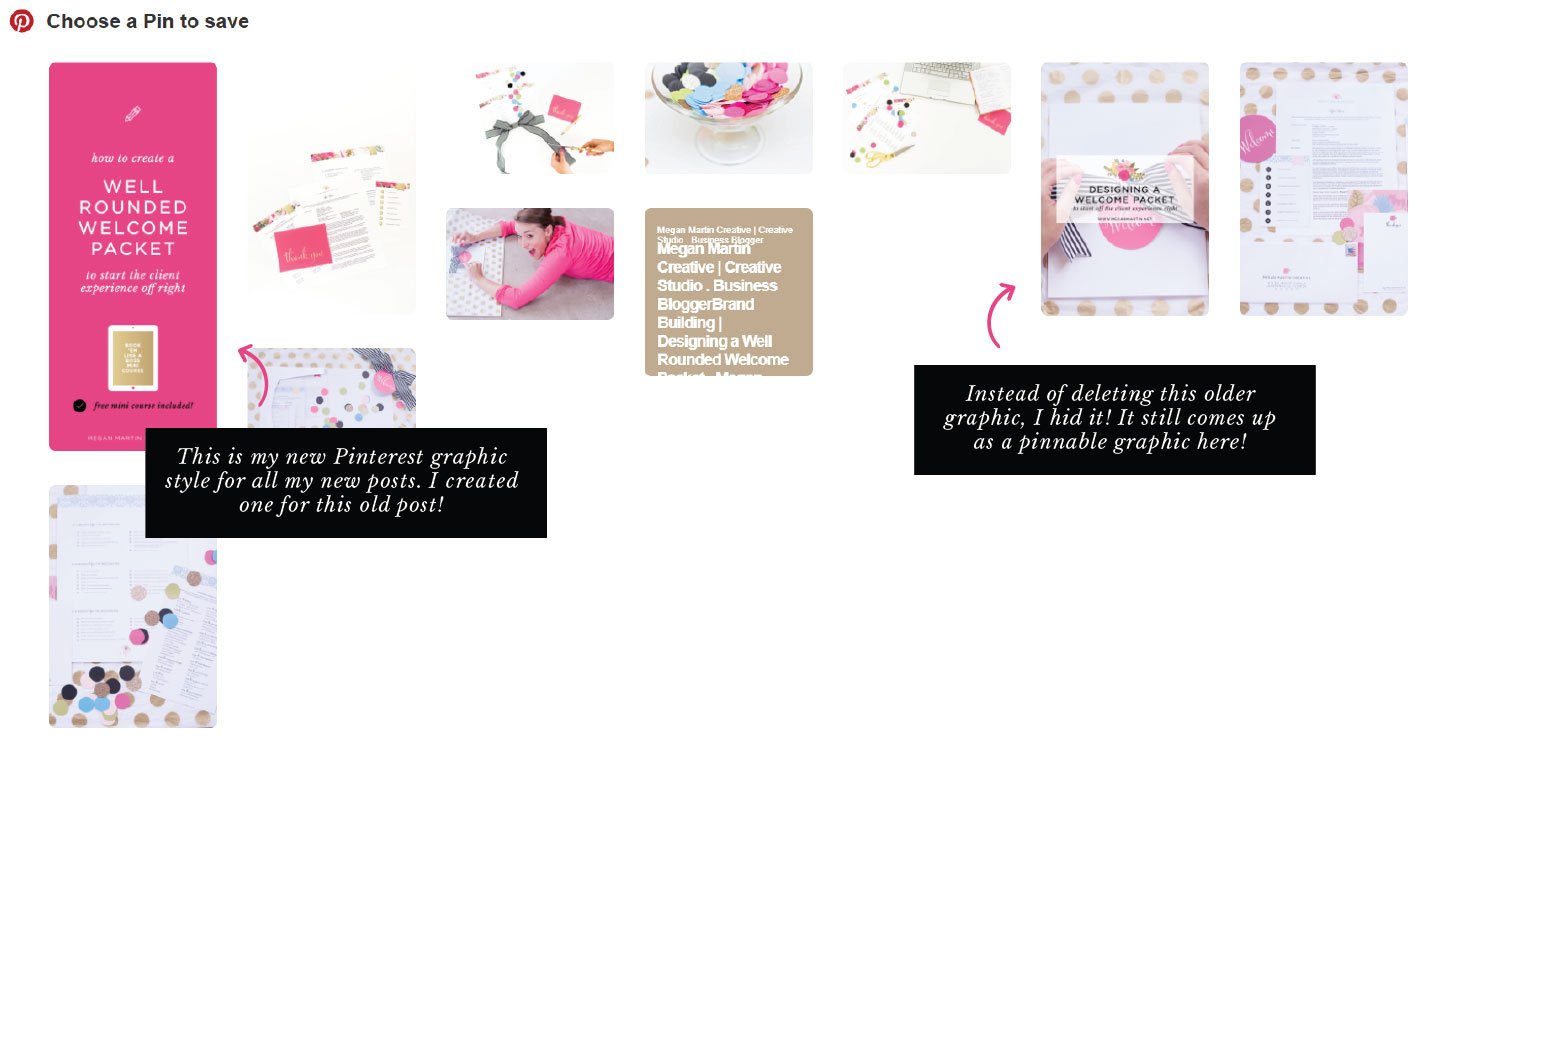
I recently updated my Pinterest blog graphics, so I wanted to make sure all of my old posts also have the updated look for pinning.
So I created a new graphic with my templates and then loaded them in. But I didn’t delete the old graphics.
I hid them!
Here’s why: like I mentioned earlier, blog posts can take time to gain traction. The same goes for pins on Pinterest. Some of my old blog post pins are still growing in re-pins daily on Pinterest (well into the 10’s of thousands). So obviously they are doing something right.
Instead of throwing those old graphics in the trash, I just hide them so you don’t see them when reading my post. But they are still there and ready to pin if someone wants to!
It just takes a little snippet of HTML code added to your image to “hide it” from view.
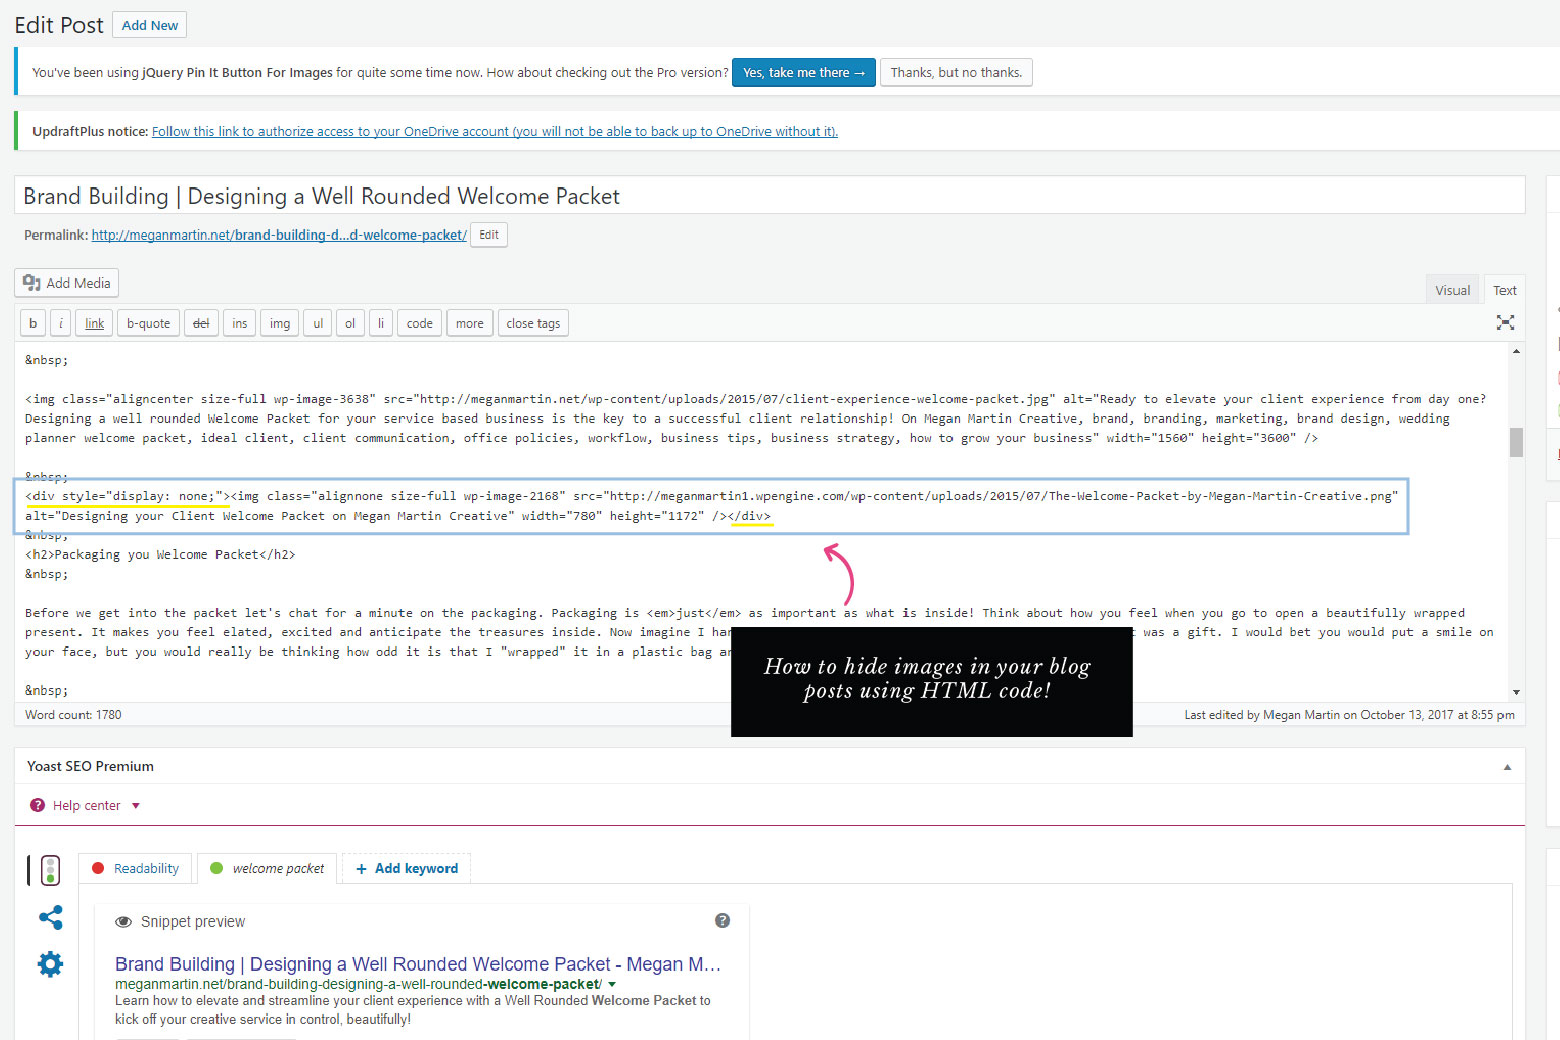
Here’s the magic trick how to:
- Click over to the HTML text version of your post.
- Locate where the image/graphic is you want to hide. It should look something like: <img src=”yourimage.jpg”> If you made your image link somewhere, it would look like <a href =”domainyoulinkeditto.com”><img src=”yourimage.jpg.com”></a>
- Add this little code snippet before your image: <div style=”display: none;”>
- And this little code snippet after your image: </div>
- So your new image code should look like: <div style=”display: none;”><img src=”yourimage.jpg”></div> (If working with an image that has a link, put your div code snippet before and after the <a href> and </a>)
When you switch back to the visual editor of your post, your image will be hidden from view. But when viewing your post live on your site, if your reader clicks to pin an image from your post, the hidden image will magically appear in the “What image do you want to pin” popup!
If your old graphics aren’t performing well or you just plain hate them, you can surely delete them. Since mine still serve a purpose, I just hide them and leave ‘em be!
#9 Update the post categories and tags
If you made the mistake in the past of choosing multiple categories for one post, fix it by just choosing one for your post to live in now.
I’d also suggest reviewing your tags to ensure they make sense for your post.
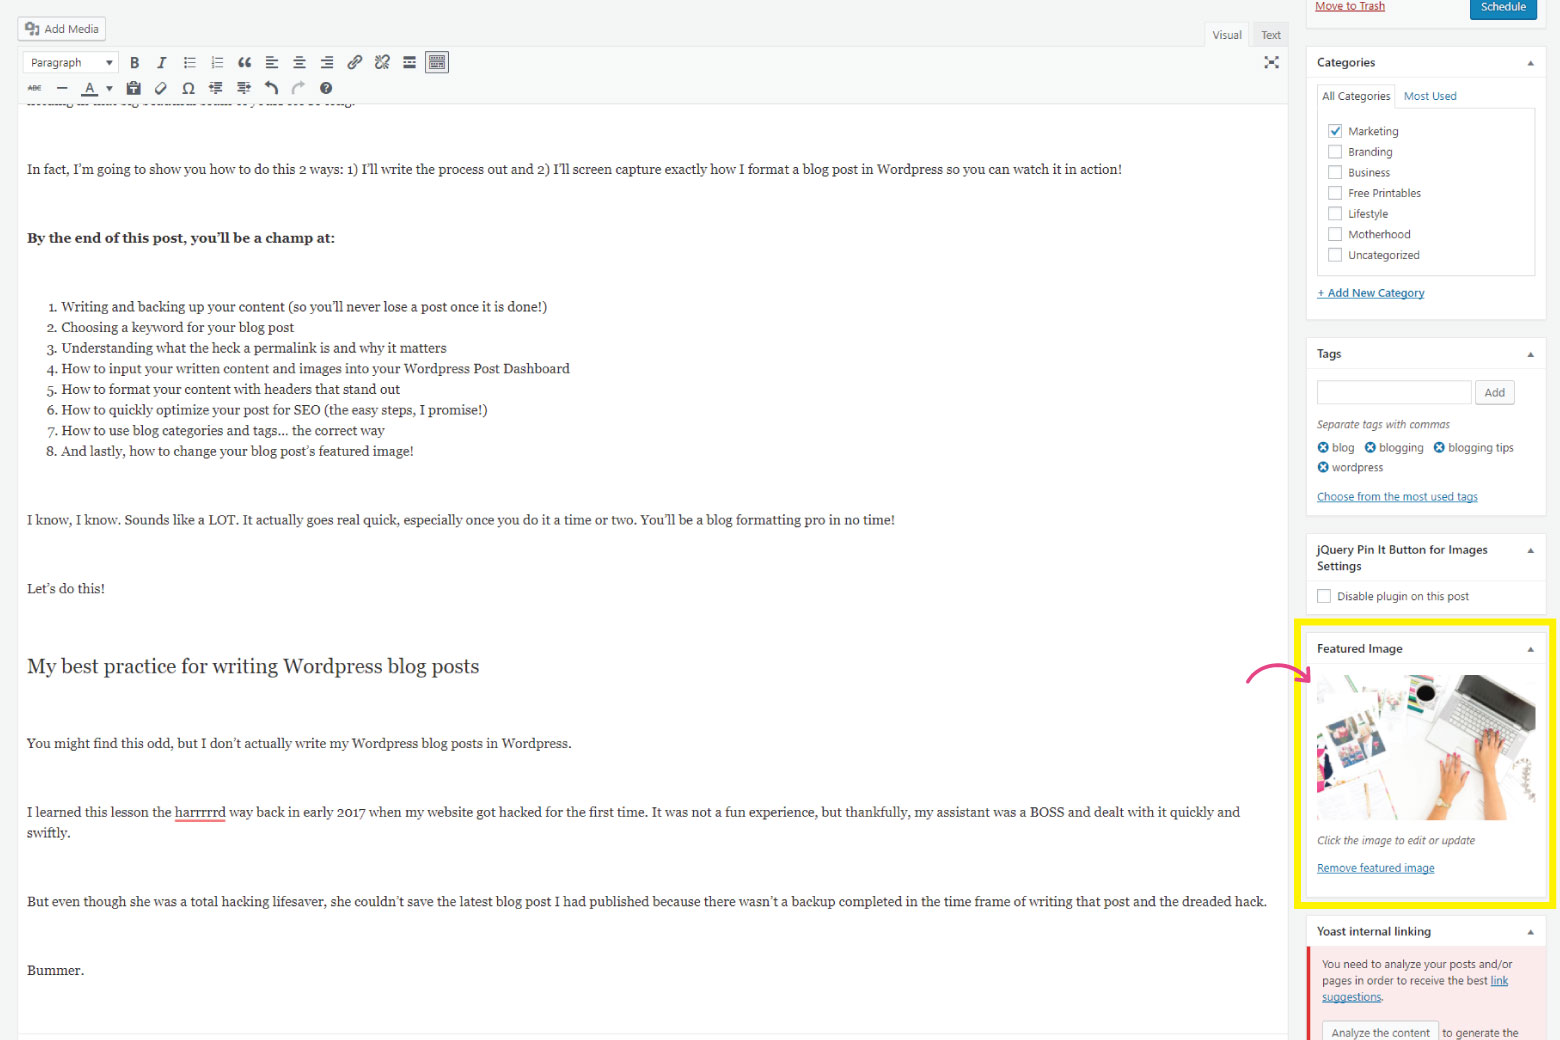
#10 Choose a featured image
In case you didn’t select a featured image in the past, or you just want to update it to a new look, choose a featured image for your post to enhance social media sharing.
Bonus: Schedule and Post Your Revived Work to Social Media!
Now that you’ve gone and done the work of reviving your old post, re-share it! Chances are, your audience has grown since you wrote your old post. Many new members of your tribe may not know about your old awesome content and would greatly benefit from reading it!
And just like that, you have gone and made your past work even stronger so it can continue to work for you in the long run. I’d call that a WIN!

Wow! This is really helpful, Megan. I especially appreciate what you said about updating the copy of an old blog post. I think it’s a great idea to add notes so the reader can follow your thinking all from one blog post. I agree with you that it’s helpful to let readers see the progression of your career in your blog post. Great ideas!